

A punching bag must be durable and properly designed for striking with fists, elbows, knees, or even feet. These bags are loved because they are incredibly versatile: you can hang one up (like a heavy bag), mount it on a wall, or leave it freestanding and use it for training in boxing, martial arts, general fitness, and stress relief. It can be hung (like a heavy bag), freestanding, or mounted on a wall.
Here’s a full guide to help you understand punching bags: how to choose one, fill it properly, use it correctly, and what benefits you can expect.
How to Choose a Good Punching Bag
There are four important factors to consider when selecting a punching bag: the type of bag, the weight of the punching bag, the material it is made of, and the mounting method.
Your objective should be to select a bag that is appropriate for your fitness level and training needs, durable and long-lasting, but also suitable to be mounted within the space you have.
- The type of punching bag you choose must match the demands of your training.
- The more experienced you are, the heavier your punching bag should be
- The material must be durable enough
- It must be easy to mount, but solid and reliable when mounted.
Choosing a Punching Bag (Step-by-Step)
Step#1. Decide on the Type of Punching Bag.
The type of punching bag you choose must match the demands of your training. The most common types of punching bags are heavy bags, freestanding bags, speed bags, double-end bags, and uppercut bags.
- Consider a heavy bag ( 40–100 lbs) if you are interested in boxing, kickboxing, or Muay Thai.
- Go for a freestanding bag if you are buying for a home gym. They are mounted on a weighted base and are easy to move.
- Consider a speed bag if you are mainly interested in training your timing and speed. They are small, fast, and mounted.
- Double-End Bags are suspended at the top and bottom, and they are ideal for reflexes and dodging.
-
Go for uppercut bags (angle bag) if you are practicing your upper cuts and hooks.
Step #2. Consider the Weight of the Punching Bag
The more experienced you are, the heavier your punching bag should be. Heavy punching bags weigh about 70-100+lbs, while lighter punching bags weigh between 40-60lbs.
- Lighter punching bags (40–60 lbs) are great for cardio workouts, women, teens, or beginners.
-
Heavier punching bags (70–100+ lbs) are better for strength, conditioning, and power training.
Step# 3. Punching Bag Materials
The material a punching bag is made of determines not only the durability of the bag, but also its price and the level of comfort it offers.
- For a premium option, go for leather punching bags. They are durable and premium, and best for professional gyms.
- For a more affordable option, go for synthetic leather punching bags (PU/PVC). They are also very durable..
-
Canvas punching bags are budget-friendly, but often less durable. They are a great option if you are going for a DIY or beginner-level punching bag.
Step# 4. Mounting Method
You always want a punching bag that is easy to mount, but solid, firm, and reliable when mounted. Punching bags are usually ceiling mounted, wall mounted, or freestanding.
- Ceiling-mounted punching bags need sturdy support.
- Wall-mounted punching bags provide less swing and are easier to control.
- Freestanding require no installation, and they are ideal if you are a renter or live in an apartment (or both).
Installation at home is a major factor when it comes to deciding on which punching bag to buy. Many people choose freestanding bags that come with a stand and require no permanent installation structures or facilities.
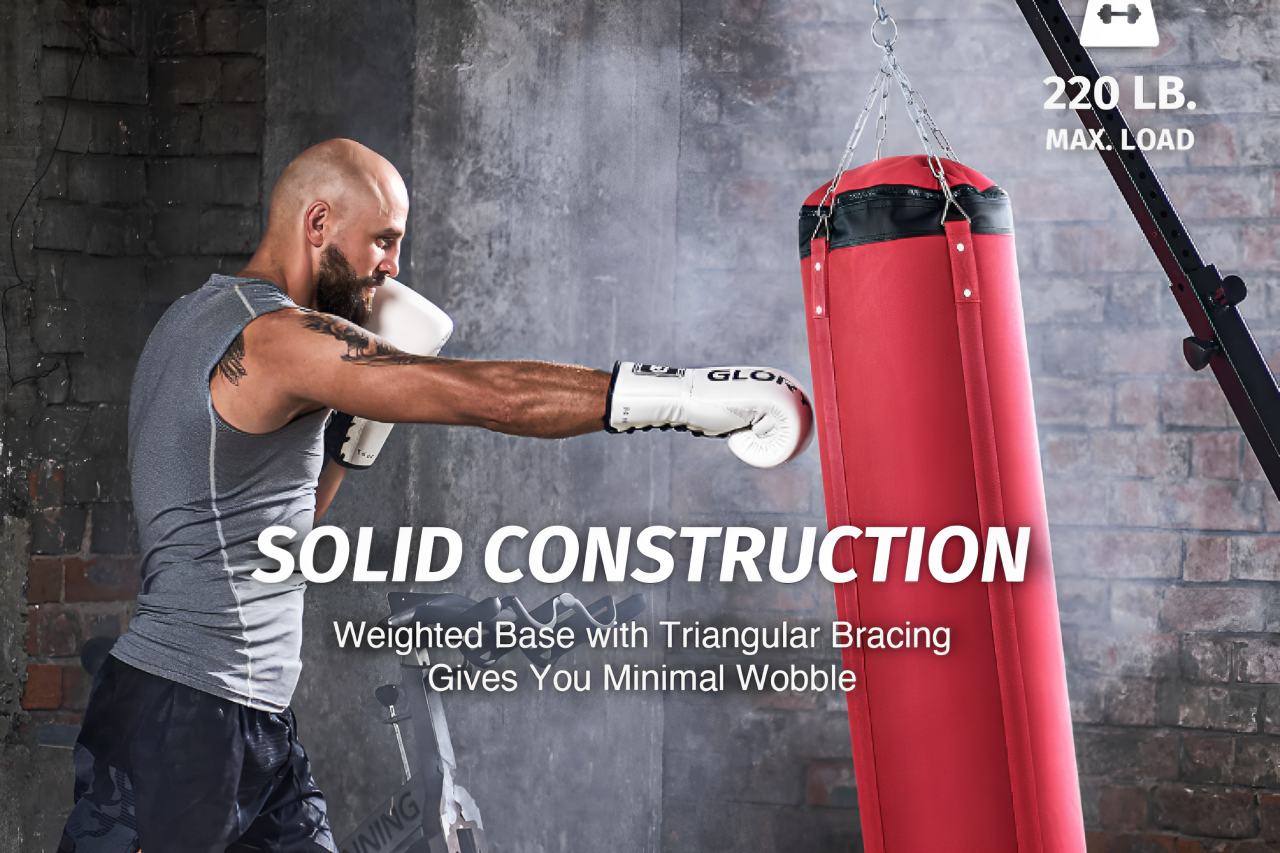
This Heavy-duty Freestanding Punching Bag by Zelus is made from sturdy metal, providing stable support and enduring strength for your intense workouts. With a 220 lb. capacity, it’s ideal for all your boxing, fitness, martial arts, and MMA training.
- Adjustable height from 5′3″ to 7′6″ and
- The tilt angle is customizable for the perfect fit.
- The canvas sandbag is durable and can hold up to 110 lb. of sand (not included)
- It is built to last through years of intense workouts
With a wide, reinforced base and three built-in plate holders (plates not included), the stand is built for sturdiness and reliability during your toughest workouts.
Benefits of Using a Punching Bag
The benefits of a punching bag are both physical and psychological. Several people who use punching bags use them not just for strength training and other forms of physical exercise, but also for stress relief and confidence building.
Here are the benefits of using a punching bag
- Cardiovascular Conditioning. It helps burn fat and increase heart rate.
- Strength & Power. A punching bag helps build your core, shoulders, and upper body.
- Practicing with a punching bag helps boxers and martial artists improve their technique.
- Hitting a bag is incredibly cathartic and helps with stress relief
- Speed or reflex punching bags are great for improving hand-eye coordination.
- A punching bag also helps develop stamina and sustained effort.

Safety Tips for Using a Punching Bag
- Always warm up before using the bag.
- Use wraps and gloves to protect your knuckles and wrists.
- Don’t overextend or hyperextend your arms.
- Ensure the bag remains at the appropriate height: it should always align with your shoulder/chin level.
How to Fill a Punching Bag
If your punching bag is unfilled, for some reason, follow these steps to fill it.
- Open the bag (usually via zipper or laces on top).
- Layer your materials to avoid lumps and distribute weight evenly.
- Compress as you go: Use a stick or bat to pack the materials tightly.
- Check firmness. It should be firm, not like a sack of pillows
What to Use for Filling (Best & Practical Options)
The best and most practical material to fill your sandbag with is a combination of old fabrics, a couple of sandbags, and some foam. Use the shredded fabric for main fill, and add the sandbags in the center for weight, and foam lining near the shell for comfort.
You must use these materials in combination because:
- Sand alone would render the punching bag too heavy and compact, especially at the bottom.
- Old fabric is soft and comfortable, but may not be hard enough for a punching bag.
A common practice for filling a punching bag that works is to start with a layer of sand, then add a layer of clothing, then another layer of sand, and so on.
Materials for Filling a Punching Bag (Pros and Cons)
| Filler Material | Description & Pros | Cons |
| Shredded Fabric | Soft, safe, and common for homemade bags | Can settle or get uneven |
| Rubber Mulch/Pellets | Heavier and adds resistance | Messy if the bag breaks, expensive |
| Sand (in bags) | Great for bottom weight & firmness | Too dense alone can break skin/bones |
| Foam Layers | Added for comfort around the core filler | Harder to shape evenly |
| Water (in special bags) | Safe and adjustable weight | Needs a leak-proof bag |
| Rice or Sawdust | Traditional, decent density | Can create dust, moisture-sensitive |
Tips for Filling Your Punching Bag With Fabrics (Clothes)
If you are using old clothing, tear out the zippers and pull out the buttons first
Use a garden tamper to compact old clothes. That way, they settle quicker and become hard in less time.
How to Punch a Punching Bag (Properly)
To punch a punching bag correctly, start by practicing your stance and form before proceeding to the basic punches and movements. Follow these instructions:

1. Stance and Form
- Stand with feet shoulder-width apart, dominant foot slightly back.
- Hands up, elbows tucked.
- Knees slightly bent, body relaxed.
2. Basic Punches
- Jab – Lead hand straight punch. Quick, light.
- Cross – Rear hand straight punch. Powerful.
- Hook – Side punch, elbow bent at 90°.
- Uppercut – Rising punch from below.
- Combination Example: Jab–Cross–Hook.
3. Technique Tips
- Turn your hips and shoulders into punches.
- Exhale sharply with each punch.
- Don’t punch with stiff arms: snap, retract quickly.
-
Wrap your hands and wear gloves to avoid injury.
Enjoy Your Punching Bag
Whether you're training for combat sports or just looking for a high-energy workout, a well-chosen and properly filled punching bag can transform your fitness routine.
With consistent practice, you can expect better endurance, sharper reflexes, and a serious boost in confidence, one punch at a time.
Check out these four must-have equipment for a home gym, and how other equipment like Zelus weighted vests can help facilitate your workout journey.
