Best Beginner Weighted Vests for Walking: A Beginner's Safety Guide
So, you’ve decided to level up your workouts by strapping on some extra gravity. Whether you are looking to break through a frustrating fitness plateau, torch more calories on your daily walks, or protect your longevity by building bone density, a weighted vest is a fantastic, hands-free tool.
In fact, a Zelus February 2026 market study surveying 1,069 actual consumers revealed that a staggering 57% of buyers couldn't name a single weighted vest brand before making their purchase.
The truth is, most beginners fall into the exact same traps: buying a vest that is way too heavy, too bulky to wear comfortably, or so poorly fitted that it causes painful chafing. It’s no surprise that 67% to 75% of negative user reviews in the industry complain entirely about uncomfortable fits and awkward designs.
You don't want your new investment gathering dust in a closet. In this beginner-friendly guide, we are breaking down the exact data-backed blueprint you need to choose your first weighted vest safely, comfortably, and within a sensible budget.
Choosing Your First Weighted Vest: A Beginner’s Guide

As a beginner, your main goals are safety, comfort, and ease of use. You want to avoid injury, chafing, or buying a vest that ends up gathering dust because it’s too heavy or uncomfortable. Based on the habits of successful beginners, here is exactly what you should look for in your first weighted vest.
A Simple Guide to Buying Your First Weighted Vest
Safety, Comfort, and Ease of Use

Fit & Stability (Rated #1 Importance at 43%):
A bouncing vest alters your center of mass mid-stride, which can increase the impact force on your knees and ankles by up to 20%. Look for a secure, dual-locking system (like heavy Velcro paired with a quick-release buckle) to lock the vest down.
Comfort & Breathability (Rated #2 Importance at 40%):
Trapping heat is a massive complaint among beginners. Vests with integrated air-mesh channels or moisture-wicking fabrics are crucial. Industry Insight: Features like cooling-touch fabric and antimicrobial odor control are the features users are most willing to pay a premium price for.
Start Light and Progress Gradually
Starting with a low initial weight is equally crucial. Beginners often overestimate how much extra load they can handle, which can lead to joint strain. A good rule of thumb is to start with a vest that weighs about 5% to 10% of your total body weight.
For men, this typically means a vest ranging from 11–22 lbs (5–10 kg), while for women, or for those focusing on walking or hiking, 6–11 lbs (3–5 kg) is ideal. This allows your body to adapt safely while still benefiting from the added resistance.
Iron Sand vs. Iron Blocks
Iron Sand Vests: This is the most popular style across the industry. It contours gently to the body and is a massive favorite for casual use. In fact, a staggering 77% to 93% of vest owners use their gear for walking or dog walking multiple times a week.

Adjustable Iron Block Vests: These feature individual pockets where you can slide solid iron weights in and out. They are highly recommended if your primary focus is strength training, as they allow you to systematically increase the load as your muscles adapt.
|
Metric |
Iron Sand Vests |
Iron Block Vests |
|
Market Popularity |
61% (The dominant industry standard) |
25% (The primary alternative) |
|
Weight Adjustability |
Typically Fixed Weight (The X-shape model has the highest purchase rate but scored the lowest user satisfaction at 27% NPS due to this limitation). |
Highly Adjustable (Allows you to slide individual blocks in and out as your joints and muscles adapt). |
|
Best Exercise Scenarios |
Low-Impact Cardio: Walking, dog walking (77%–93% frequency among users), and household chores. |
Strength Training: Push-ups, squats, lunges, and progressive resistance workouts. |
|
Core Beginner Advantage |
Shifting sand contours naturally to the body, making it feel less rigid and bulky. |
Allows you to start ultra-light (e.g., 4–6 lbs) and safely build up to heavier weights. |
Design & Fit
Traditional tactical or military-style vests look rugged, but market surveys show they are rarely favored by everyday fitness enthusiasts (only about 11% prioritize tactical styling).
Instead, look for an X-shape or U-shape ergonomic cut. These styles distribute the load evenly across your upper chest and back while leaving your waist and sides completely free. This allows your lungs to expand fully during heavy cardio and keeps your arms completely unrestricted for push-ups, squats, or power-walking.
Price

You don't need to break the bank. Roughly 55% to 60% of consumers state that the ideal sweet spot for a high-value, reliable starter vest falls comfortably between $50 and $100.
Handy Extras
Don’t overlook convenient extras. Reflective strips improve safety for early morning or late-night walks and runs, while built-in mesh pockets for your phone, keys, or earbuds make your workouts far more practical by keeping your hands free. These small features can make a big difference in usability and enjoyment.
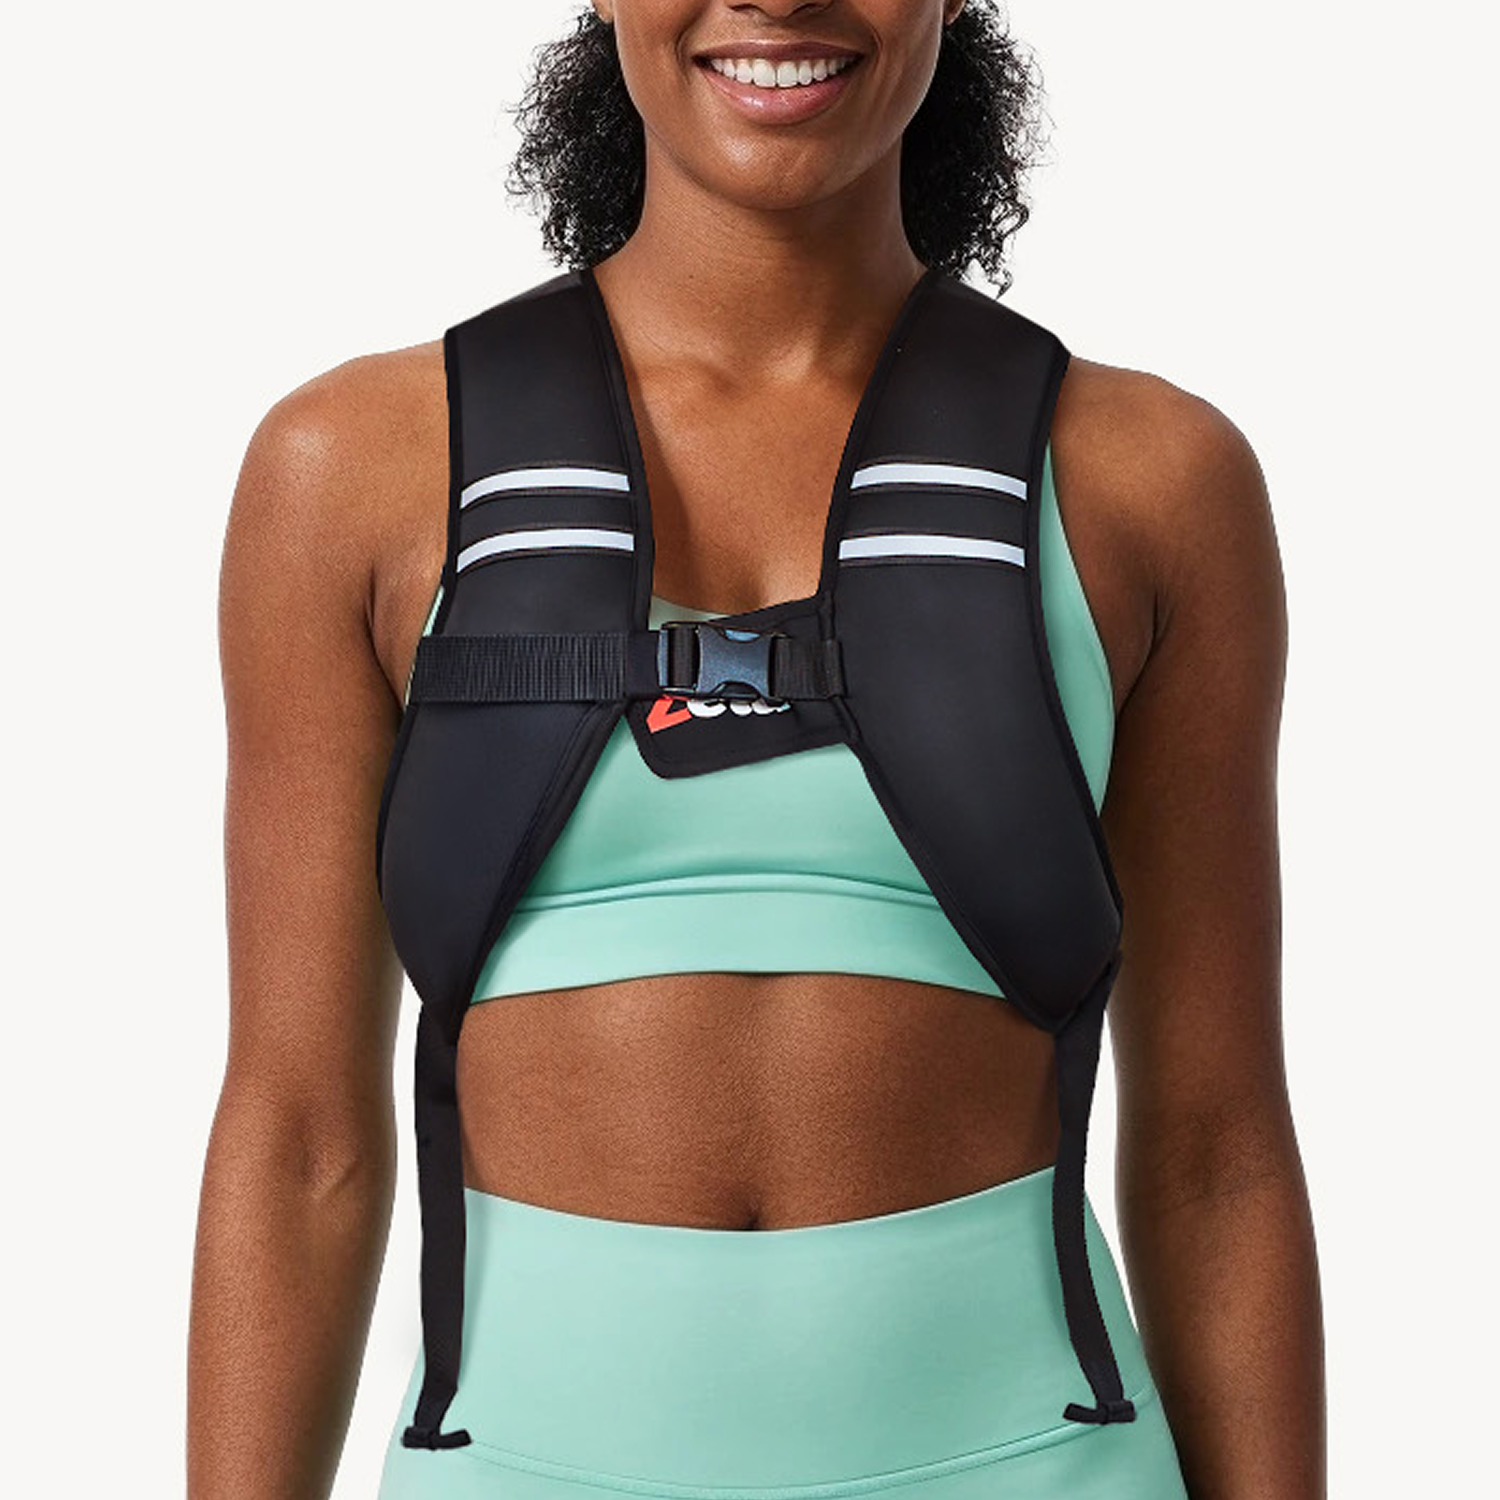
Best Beginner Weighted Vest for Women

|
PRODUCT |
|
|
IMAGE |
|
|
MODEL |
Classic + U-Shape |
|
SERIES |
Classic |
|
RECOMMENDED SPORTS |
Walking · Rucking · Yoga |
|
WORKOUT INTENSITY |
💪💪💪 |
|
COMFORT |
★★★★☆ |
|
SHAPE |
U-Shape |
|
WEIGHT TYPE |
Adjustable |
|
WEIGHT RANGE |
4 – 32 lb |
|
FILL MATERIAL |
Iron Sand |
|
BUILD MATERIAL |
Breathable Fabric |
|
NOISE LEVEL |
Low |
|
COLORS |
1 (Black) |
|
REFLECTIVE STRIPS |
Yes |
|
Cleaning Choice |
Wipe |
|
POCKETS / STORAGE |
Yes |

Why It’s Perfect for Female Beginners:
- The U-Shape design is the ultimate antidote to the number one complaint among women in the 2026 dataset—where 48% of women reported severe chest pressure and breath restriction when wearing traditional crossover or tactical vests. The U-Shape contours naturally around the torso, leaving the mid-chest free.
- The market report notes that beginners frequently overestimate their initial capacity, leading to premature joint strain. Because this vest is Adjustable from 4 to 32 lbs, it allows you to start at the medically recommended 5% to 10% body weight threshold (usually 6–11 lbs for women) and safely scale up as your bone mineral density and muscles adapt.
- Since 77% to 93% of users primarily use their vest for walking, dog walking, or doing household chores, the soft Iron Sand filling prevents rigid bruising, while the built-in storage pockets keep you hands-free for your phone and keys.
Best Weighted Vest Sizes for Plus-Sized Women
Best Weighted Vests for Large-Busted Women
Best Beginner Weighted Vest for Men

|
PRODUCT |
|
|
IMAGE |
|
|
MODEL |
Classic X-Shape |
|
SERIES |
Classic |
|
RECOMMENDED SPORTS |
Beginner · Home Gym · Outdoor |
|
WORKOUT INTENSITY |
💪💪💪 |
|
COMFORT |
★★★☆☆ |
|
SHAPE |
X-Shape |
|
WEIGHT TYPE |
Fixed |
|
WEIGHT RANGE |
6 – 30 lb |
|
FILL MATERIAL |
Iron Sand |
|
BUILD MATERIAL |
Breathable Fabric |
|
NOISE LEVEL |
Low |
|
COLORS |
6 colors |
|
REFLECTIVE STRIPS |
Yes |
|
Cleaning Choice |
Wipe |
|
POCKETS / STORAGE |
Yes |

Why It’s Perfect for Male Beginners
- Men's training styles typically involve broader, more dynamic movements. The ergonomic X-Shape design leaves the sides of the waist completely open. This is crucial for beginner-friendly upper body movements like incline push-ups and bear crawls, ensuring the vest doesn't rub against your arms or throw off your center of mass.
- In the 2026 study, 42% to 44% of male users rated "Fit & Stability" as their absolute highest priority. A bouncing vest during outdoor training increases kinetic knee impact forces by up to 20%. The X-Shape harness locks securely to your torso, guaranteeing minimal bounce when transitioning from walking to bodyweight circuits.
- While many men are drawn to tactical steel plate or iron block vests, 29% of strength trainers complain that rigid blocks painfully shift their center of gravity or dig into their collarbones during squats. The Iron Sand filling inside the FWV-ZD deadens the weight, shifting fluidly with your frame while providing a solid, balanced 3-star intensity workout.
Beginner Walking Plan with Weighted Vest
|
Week |
Vest Weight (% of Body Weight) |
Frequency |
Duration per Session |
|
Week 1 |
5% |
2x per week |
15 minutes |
|
Week 2 |
5% |
2x per week |
20 minutes |
|
Week 3 |
7% |
2x per week |
20 minutes |
|
Week 4 |
10% |
3x per week |
20 minutes |
5 Safe and Effective Weighted Vest Exercises for Beginners

When you are new to training with a weighted vest, the goal is to master foundational, functional movements before trying advanced plyometrics or heavy running. Because the vest increases the load on your spine and joints, sticking to controlled bodyweight exercises is the safest way to build strength.
1. Weighted Walking / Rucking
This is the absolute best entry point for a weighted vest. It builds cardiovascular endurance and strengthens your lower back, glutes, and core without the high impact of running.
How to do it: Strap on your vest (aim for 5% to 10% of your body weight) and go for a brisk 15 to 20-minute walk around your neighborhood or on a treadmill. Maintain a tall posture and keep your core slightly engaged.
2. Box Squats or Air Squats
Squats target your quadriceps, hamstrings, and glutes. The vest forces your core to work harder to keep your torso upright.
How to do it: Stand with feet shoulder-width apart. Push your hips back and bend your knees as if sitting in a chair. If you are worried about balance, squat down until your butt lightly touches a sturdy chair or bench (a box squat), then stand back up. Aim for 3 sets of 10–12 repetitions.
Weighted Vests for Squats: Why It Works
3. Incline or Standard Push-Ups
Adding a vest to a push-up increases the resistance on your chest, shoulders, and triceps, while demanding extra stability from your plank position.
How to do it: If standard floor push-ups feel too heavy with the vest, place your hands on an elevated surface like a bench or a sturdy table (incline push-ups). Keep your body in a straight line from head to heels, lower your chest, and push back up. Aim for 3 sets of 8–10 repetitions.
Weighted Vests for Push-Ups: Does It Work?
4. Reverse Lunges
Lunges build unilateral (single-leg) strength and stability. Reverse lunges are generally safer for a beginner's knees than forward lunges because they keep the weight centered over your front heel.
How to do it: Stand tall, take a controlled step backward with your right foot, and lower your hips until your left thigh is parallel to the floor. Push through your front heel to return to the starting position. Alternate legs. Aim for 3 sets of 8 reps per leg.
5. Bear Crawls
This is an incredible full-body movement that safely challenges your shoulders, core, and coordination under the extra weight of the vest.
How to do it: Get on all fours with your hands under your shoulders and knees under your hips. Lift your knees just an inch off the ground. Crawl forward by moving your opposite hand and foot together (e.g., left hand and right foot). Keep your back flat like a tabletop. Try crawling forward for 10 steps, then backward for 10 steps. Repeat 3 times.
Crucial Safety Tips for Weighted Vest Beginners

When you wear a weighted vest, you aren't just making your muscles work harder; you are changing your center of gravity and placing a significantly higher load on your spine, joints, and connective tissues.
1. Master the "Two-Finger" Fit Test
How your vest fits directly impacts your biomechanics and your safety. A vest that is too loose will bounce, shift, and chafe, which can pull you off balance or alter your natural movement patterns.
Fasten the straps or buckles securely around your torso. You should be able to slide exactly two fingers flat between the vest and your chest.
Take a deep, belly-expanding breath. If the vest restricts your ribs from fully expanding, it is too tight. If you jump vertically and the vest hits you in the chin or slides down your hips, it is too loose.
2. Protect Your Spine with Active Core Engagement
Adding weight to your upper body naturally forces your torso to lean forward to compensate, especially as you get tired. This puts immense, dangerous shearing force on your lower back (lumbar spine).
Before you start any movement, lock in your posture. Imagine "zipping up" your abs—draw your belly button toward your spine and slightly tuck your pelvis under.
If you notice your lower back starting to arch excessively (banana back) or you feel a dull ache in your lumbar region, your core muscles have fatigued. Take the vest off immediately; continuing will force your spine to bear the load.
Weighted Vest Core Strength: Benefits, Exercises & Workouts Guide
3. Differentiate Between "Muscle Burn" and "Joint Stress"
As a beginner, you must learn to read your body’s biofeedback under an external load.
A deep burning sensation in your thighs during squats, or heavy breathing during a walk, is normal. This is cardiovascular and muscular fatigue.
Sharp, pinching, or localized clicking in your knees, ankles, hips, or lower back is a red flag. Because a vest multiplies the impact on your joints, continuing through joint pain can quickly lead to tendonitis, shin splints, or compression injuries. If it hurts a joint, stop.
4. Limit Frequency and "Time Under Load"
Connective tissues (tendons and ligaments) adapt to extra weight much slower than muscles do. Just because your muscles can handle a 45-minute vest workout doesn't mean your knees and ankles are ready for it.
- The Timeline: Limit your weighted vest training to 1 or 2 times per week to start, with at least 48 hours of rest between sessions.
- The Duration: Keep your initial workouts to a strict 15 to 20 minutes. Do not wear the vest for your entire gym session; put it on only for the specific exercises you planned, then take it off to finish your workout.
5. Clear the Area and Mind Your Balance
A weighted vest shifts your center of gravity higher up on your torso, which naturally impairs your balance and proprioception (your body's awareness of where it is in space).
Before putting the vest on, ensure your workout space is completely clear of tripping hazards (like stray dumbbells, yoga blocks, or pets). Perform a few slow, unweighted repetitions of your exercises first to prime your brain. When moving with the vest, focus your eyes on a fixed point ahead of you rather than looking down at your feet, which can cause you to topple forward.
Final Words
At the end of the day, choosing your first weighted vest shouldn't feel like preparing for combat. Instead, the path to long-term success comes down to a simple, golden rule: prioritize fit, stability, and comfort over aesthetics.
Remember to start light by strictly sticking to the 10% body weight rule, lock in your active core posture, and give your joints time to adapt by keeping your initial sessions under 20 minutes.
By choosing a vest tailored to your specific gender, frame, and fitness goals, you won’t just be buying a piece of exercise equipment—you’ll be successfully upgrading your body's daily metabolic potential.
Before You Go…
Here are a few handpicked articles to inspire your next self-care moment.