Weighted Vest Yoga: 20+ Poses That Become 10x More Effective
If you’ve been practicing yoga for years, you know the routine: you step onto the mat, move through your standard Vinyasa or Hatha sequence, and rely entirely on your own body weight to find stability. It’s mindful, it’s therapeutic—but eventually, your muscles adapt, and your progress plateaus.
To break through that wall, a growing wave of practitioners are turning to a deceptively simple modification: weighted vest yoga. By anchoring the resistance uniformly around your physical center of gravity, you can deepen your practice without sacrificing your alignment or your breath.
The trouble is, most weighted gear on the market wasn't built for a Downward Dog. According to the Zelus February 2026 Weighted Vest User survey, a massive 44% of consumers report intense frustration with traditional vests shifting, bouncing, or pulling painfully on their lower back due to a poor fit. When a bulky vest slides into your chin during an inversion or pinches your spine during a twist, your mindfulness instantly shatters.
Whether you are looking to accelerate fat loss, build deep anti-extension core strength, or restore long-lost posture, this comprehensive guide will show you how to do it safely. Read on to discover how a curated sequence of 20+ yoga poses becomes 10x more effective the moment you add a layer of fluid resistance.
What Is Weighted Vest Yoga?

Weighted vest yoga is a hybrid practice where traditional asanas are performed while wearing a specialized, body-contouring vest with evenly distributed resistance.
In this variation, gravity becomes a much more active force. Poses that normally feel like recovery transitions—such as Cat-Cow, Tabletop, or Tree Pose—instantly turn into core stability and balance drills. It bridges the gap between low-impact cardio, stability training, and mindful mobility. For most practitioners, starting with a light load (5 to 10 lbs) is more than enough to spike the metabolic demand without compromising form or joint safety.
Key Training Effects: Why Add Resistance?
When you step onto the mat with an extra layer of gravity, your practice crosses over into functional calisthenics-style conditioning. This sequence builds:
- Core Anti-Extension Strength: Your deep abdominal muscles must fire continuously to keep your spine neutral under the extra load.
- Shoulder Stability under Load: Weight-bearing poses intensely condition the rotator cuff and scapular stabilizers.
- Balance under Resistance: Shifting your center of gravity forces your feet, ankles, and stabilizers to make micro-adjustments.
- Low-Impact Conditioning: You elevate your heart rate and torch calories without the joint-jarring impact of jumping or running.
Crucial Safety Protocols & Gear Preparation
To ensure a safe, therapeutic practice, keep these guidelines in mind before stepping onto the mat:
- Start Ultra-Light: Beginners should start with 5–8 lbs. Never compromise your range of motion for extra weight.
- Protect Your Breathing: Avoid over-tightening traditional straps across your chest. Based on the Zelus February 2026 User survey, a staggering 48% of female users experience suffocating chest tightness or restricted breathing when strapping down traditional, rigid vests tightly enough to prevent movement. Look for a flexible, soft silicone vest that expands dynamically as your lungs expand.
- Keep Joint Angles Soft: Avoid hyper-extending or locking out your knees and elbows under load, particularly in forward folds or arm-balances.
- Utilize Support Props: Keep yoga blocks and a strap nearby. Blocks are highly recommended to elevate the floor during lunges and forward folds, preventing lower back strain.
The Weighted Vest Yoga Sequence
1. Centering + Breath Activation
Pose: Easy Seat (Sukhasana)
How-to:
- Come to a comfortable, cross-legged seated position in the center of your mat, allowing your feet to rest naturally beneath your knees.
- Place your hands softly on your knees or thighs.
- Close your eyes and draw your internal awareness to your breath.
- As you inhale, feel your spine lengthen one vertebra at a time from your tailbone up through the crown of your head, drawing you tall.
- Roll your shoulders back and down, allowing them to relax away from your ears.
- Maintain 5 to 8 slow, deep diaphragmatic breaths here.
Focus:
As you sit in stillness wearing your weighted vest, you will immediately feel the mass of the vest pulling vertically downward, anchoring your ribcage and pelvis firmly into the earth. This deep sense of grounding helps down-regulate your nervous system.
As you inhale, actively expand your ribcage outward against the snug resistance of the vest.
As you exhale, surrender to gravity, allowing your sit bones to root deeper. This conscious breathing against external load immediately wakes up your respiratory stabilizers.
2. Warm-Up Mobility
Pose: Cat–Cow & Thread the Needle
How-to:
- From your seated position, gently transition onto all fours into a tabletop position.
- Stack your wrists directly underneath your shoulders and place your knees hip-width apart, perpendicular to the floor.
- Inhale as you drop your belly, lift your chest, and let your tailbone tilt slightly upward into Cow Pose.
- Exhale as you press firmly through your palms, dome your upper back, and pull your belly button tightly toward your spine, tucking your chin for Cat Pose.
- Repeat this dynamic flow for 6 to 8 slow rounds, feeling the articulation of your spine under the extra load.
- Return to a neutral spine, inhale to sweep your right arm high to the sky, and exhale to slide it underneath your torso, lowering your shoulder and cheek softly to the mat for Thread the Needle.
- Hold for 3 deep breaths before switching sides.
Effect:
Because the mass of the vest is concentrated directly over your torso, every spinal extension and flexion is performed under active resistance, strengthening the intrinsic stabilizer muscles along your spine. In Thread the Needle, the vest increases the shoulder stability demand on your supporting arm while leveraging gravity to provide a deeper, passive release across your upper back and shoulder blades.
3. Downward Dog Flow
Pose: Downward-Facing Dog to Plank Flow
How-to:
- From your tabletop position, walk your hands forward about one hand-print, spreading your fingers wide and pressing down through your knuckles.
- Tuck your toes, engage your core, and lift your hips high and back, shifting your body into an inverted "V" shape for Downward-Facing Dog.
- Hold here for 5 deep breaths, keeping a soft bend in your knees if your hamstrings feel tight to prioritize a long, straight spine.
- From here, begin your dynamic flow: inhale as you shift your body weight forward at a uniform pace until your shoulders stack directly over your wrists and your body forms a rigid line from head to heel in a high Plank Pose.
- Exhale as you pull your lower abs in and push your hips back up into Downward Dog.
- Repeat this sequence with total control for 3 slow rounds.
Focus:
As your body transitions through space, you must continuously resist the pull of gravity on the vest. When gliding forward into Plank, you must intensely fire your core and serratus anterior to prevent your hips or lower back from sagging under the hanging load. This flow blends core anti-extension strength with shoulder stability, elevating your heart rate even at a slow tempo.
4. Standing Strength Block
Pose: Mountain, Chair, Warrior Series & Triangle
How-to:
From Downward Dog, step your feet forward between your hands and slowly roll up through your spine to stand at the top of your mat in Mountain Pose (Tadasana). Bring your feet together, ground evenly through all four corners of your feet, slightly tuck your pelvis, and hold for 5 breaths, noticing how the vest naturally coaxes your shoulders into alignment. Next, inhale to sweep your arms upward and exhale to sit your hips back and down as if sinking into an invisible chair for Chair Pose (Utkatasana). Hold for 5 to 8 breaths. For an intermediate upgrade, add tiny, controlled micro-pulses at your lowest point, allowing the vest’s weight to sink directly into your quads and glutes.
From Chair Pose, step your left foot back into a wide stance, sealing the outer edge of your back foot flat into the mat while bending your front knee to 90 degrees. Inhale to lift your torso and sweep your arms overhead for Warrior I (5 breaths). Open your hips and arms out to the sides, gazing over your front middle finger for Warrior II (5 breaths). Flip your front palm and lean back, sliding your left hand down your back leg for Reverse Warrior (3–5 breaths). Focus on agonizingly slow, seamless transitions rather than rushing between these holds.
Finally, straighten your front leg, push your hips back, reach your front arm infinitely forward, and hinge down into Triangle Pose (Trikonasana), resting your bottom hand on a block or your shin while extending your top arm straight to the sky. Hold for 5 breaths on each side.
Effect:
The weighted vest acts as an intensity multiplier across this entire standing sequence. It converts Chair Pose into a high-yield lower-body endurance hold and forces your feet to anchor aggressively during the Warrior transitions. When you enter Triangle Pose, your torso is suspended laterally against gravity; the vest multiplies this leverage, heavily recruiting your obliques to keep your spine from collapsing toward the mat.
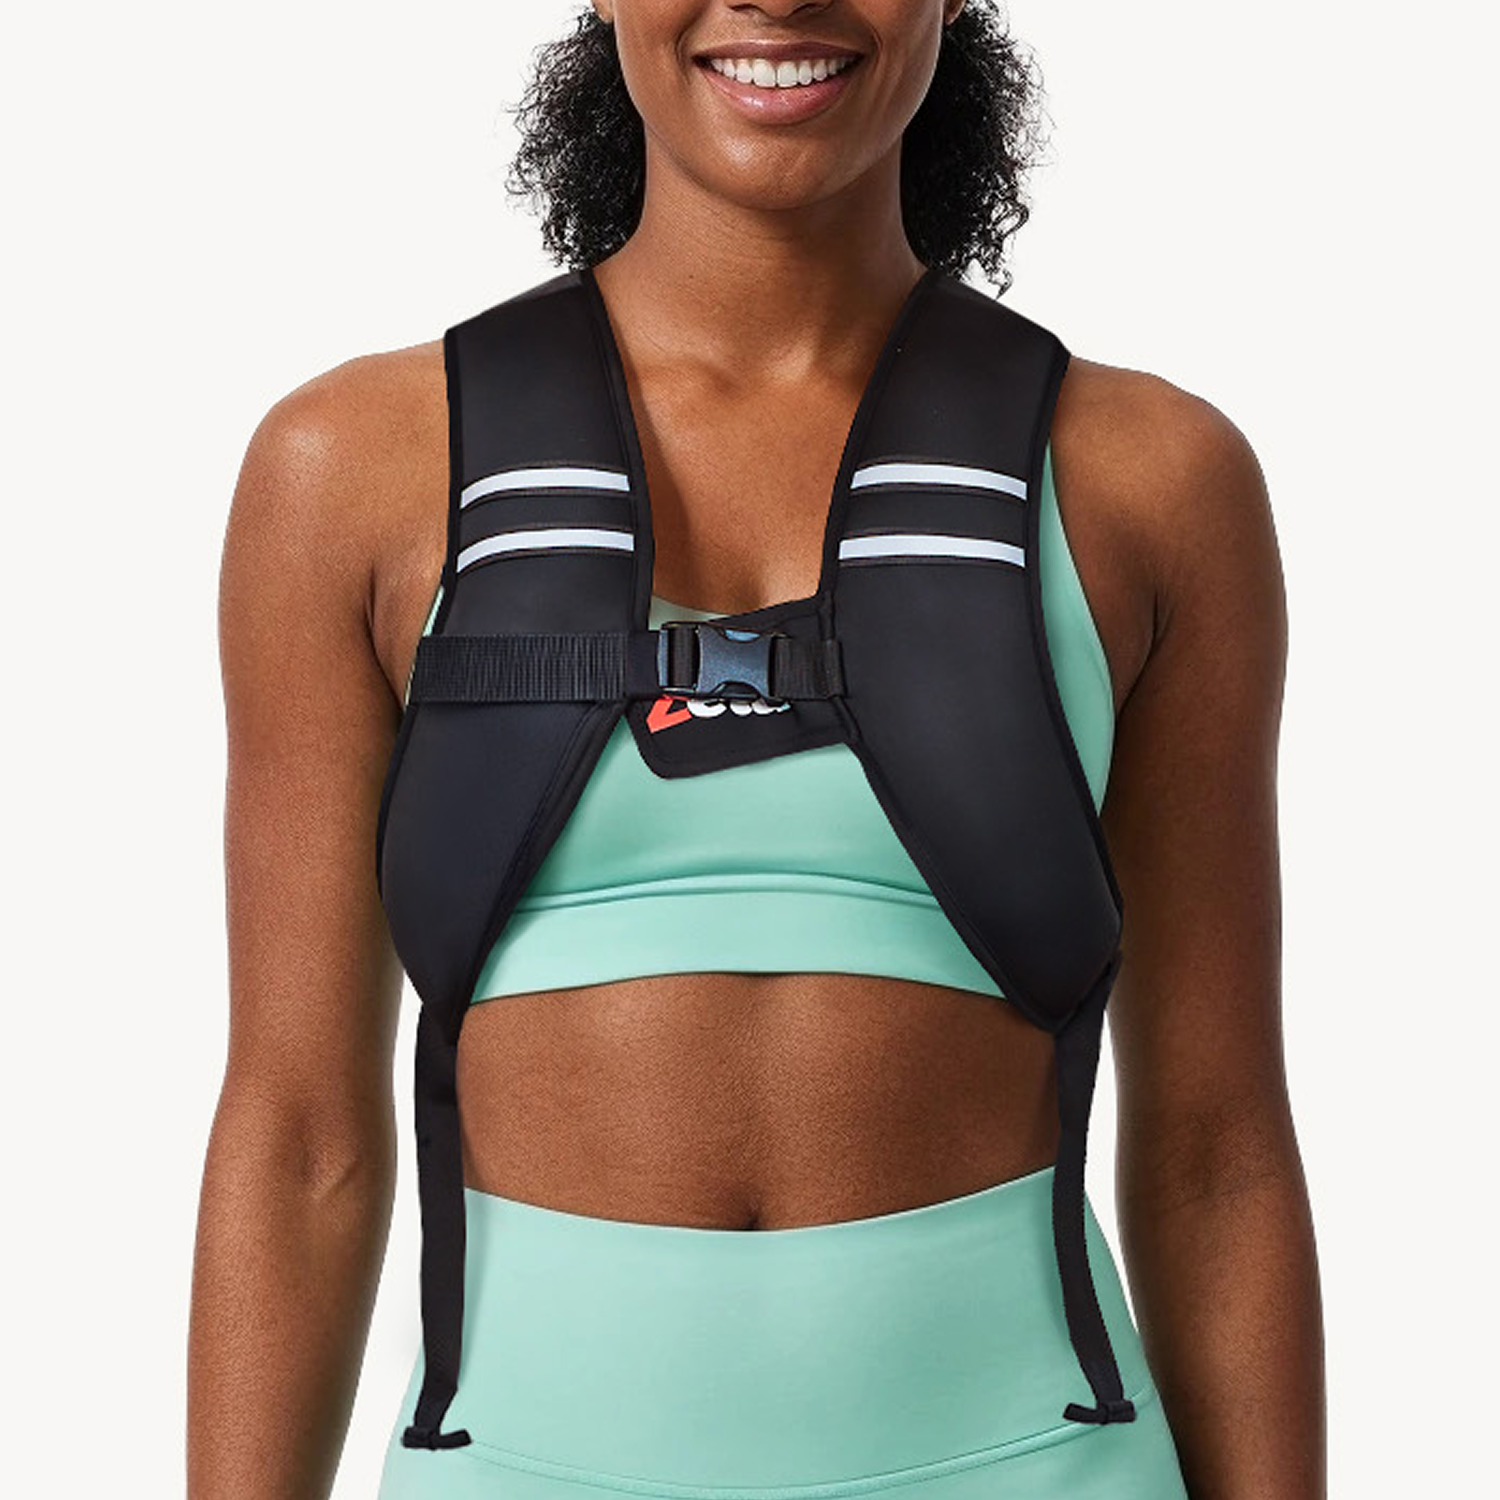
A Note on Female Anatomy & Comfort
For female practitioners, standard fitness vests often present a major design flaw during standing and balancing sequences. Traditional tactical vests rely on rigid, flat plates or bulky sandbags strapped tightly across the chest.
Based on the Zelus February 2026 User survey, a staggering 48% of female users experience suffocating chest tightness or restricted breathing when trying to secure traditional vests tightly enough to prevent bouncing.
To avoid this, look for an X-shaped, ergonomically contoured vest. An open-chest design ensures that the weight distributes evenly around your center of gravity without compressing your lungs, allowing you to breathe fully during intense holds.
5. Balance & Core Integration
Pose: Tree Pose & Eagle Pose
How-to:
- Return to Mountain Pose at the top of your mat.
- Shift your entire body weight into your left foot, clamping your left thigh muscles tight to create a solid foundation.
- Lift your right foot and place the sole flat against your inner left thigh or shin—strictly avoiding the knee joint.
- Bring your hands to a prayer position at your heart, fix your gaze on a single unmoving point ahead, and hold Tree Pose for 5 breaths (option to close your eyes to challenge your balance).
- Without letting your right foot touch the floor, smoothly transition by wrapping your right thigh tightly over your left, hooking your right toes behind your left calf if accessible.
- Cross your arms at the elbows in front of your chest, sink your hips low, and hold Eagle Pose for 5 steady breaths before slowly unwinding and repeating on the opposite side.
Expectation:
Expect a major wobble! Your nervous system is calibrated to balance your standard body weight, but adding a vest completely shifts your true center of gravity, amplifying every microscopic tilt of your torso. To keep you upright, your ankle stabilizers, knee ligaments, and deep core muscles are forced to fire in rapid, high-frequency micro-adjustments. This turns balancing into a profound neuromuscular coordination drill.
6. Floor Strength Block
Pose: Plank, Slow Push-Ups & Boat Pose
How-to:
- Gently release your balance and step back into a high Plank Pose.
- Squeeze your glutes, pull your navel to your spine, and ensure your head, upper back, and hips are aligned in a straight sheet of steel.
- Hold statically for 30 to 60 seconds, repeating for 2 rounds.
- Next, lower your knees softly to the mat (or keep them lifted for a full variation) to prepare for push-ups.
- Lower down using a strict, eccentric tempo: take a full 3 seconds to lower your chest toward the floor, then press back up with power, completing 5 to 10 repetitions.
- Finally, swing your legs around, sit flat on your mat, and bend your knees.
- Lift your feet until your shins are parallel to the floor, lean your torso back slightly, and extend your arms forward to form a compact "V" shape in Boat Pose (Navasana).
- Hold for 20 to 40 seconds for 2 rounds.
Effect:
Planks and slow push-ups under vest resistance replicate advanced calisthenics training, placing immense structural demand on your chest, anterior deltoids, and triceps. The real transformation, however, happens in Boat Pose: with the weight of the vest resting directly on your torso, your rectus abdominis must work exponentially harder to prevent your lower back from rounding, creating a deep, trembling core burn.
7. Back Body Strength
Pose: Cobra Pose & Locust Pose
How-to:
- From Boat Pose, lower your legs and roll smoothly onto your stomach, stretching your legs long behind you with the tops of your feet pressing into the mat.
- Place your hands flat on the floor directly beneath your shoulders, hugging your elbows tight against your ribs.
- Using the strength of your back muscles rather than pushing through your hands, inhale to peel your chest, shoulders, and head off the mat.
- Keep your gaze down to maintain a long neck in Cobra Pose. Hold for 5 breaths, repeating for 3 rounds.
- For an advanced upgrade, move into Locust Pose by lifting your chest, sweeping your arms back parallel to the floor, and lifting your legs off the mat entirely, balancing only on your belly and pelvis for 3 to 5 breaths.
Focus:
This block is designed to isolate and strengthen your posterior chain. For anyone who spends hours a day sitting at a desk, the muscles of the upper back become chronically overstretched and weak. The vest adds targeted resistance right over your thoracic spine, forcing your erector spinae, rhomboids, and rear deltoids to fire powerfully against gravity, helping to actively correct "desk slouch" and restore posture.
8. Glute + Bridge Block
Pose: Bridge Pose & Single-Leg Bridge
How-to:
- Roll over from your stomach onto your back, lying flat in a supine position.
- Bend your knees and place your feet flat on the mat hip-width apart, bringing your heels as close to your glutes as possible with your arms resting by your sides.
- Inhale, press firmly through your heels, and squeeze your glutes to drive your hips straight up toward the ceiling until your thighs and torso form a straight, sloping line in Bridge Pose.
- Hold for 8 to 10 deep breaths, completing 2 rounds.
- If you want an advanced stability challenge, keep your hips level and extend your right leg straight up toward the ceiling in a Single-Leg Bridge, holding for 3 to 5 breaths before switching sides.
Effect:
In Bridge Pose, the weight of the vest rests directly over your hips and pelvic bowl, acting exactly like a hip thrust machine. This places a highly concentrated load on your glutes and hamstrings to keep your hips elevated. The single-leg variation forces deep stabilization through the pelvic floor and lower back, working to correct muscle imbalances caused by everyday movement patterns.
9. Cool Down
Pose: Seated Forward Fold, Supine Spinal Twist & Reclined Figure Four
How-to:
- Slowly lower your spine vertebra by vertebra back to the mat, then use your core to sit upright, extending both legs straight in front of you.
- Inhale your arms high, and exhale to hinge forward from your hips, reaching for your feet or utilizing a yoga strap around your soles for a Seated Forward Fold (5–10 breaths).
- Next, lie back down, bend your knees, and let them drop completely to the left side while opening your arms out wide into a "T" shape, turning your gaze to the right for a Supine Spinal Twist (5 breaths per side).
- Finally, return to center, cross your right ankle over your left knee, and pull your left thigh toward your chest for a Reclined Figure Four stretch, holding deeply to release the outer hips.
Focus:
The focus now completely shifts from active muscular contraction to deep myofascial release and down-regulating your nervous system. The forward fold elongates the back body that just worked under load, while the twist and figure-four stretch knead out lingering tension in the glutes, hips, and lumbar spine. Allow your breath to slow down entirely.
10. Final Relaxation
Pose: Corpse Pose (Savasana)
How-to:
- Before settling into this final shape, unclip or unzip your weighted vest, remove it completely, and set it to the side.
- Lie completely flat on your back, letting your feet drop open naturally toward the corners of your mat.
- Turn your palms to face upward, let your fingers curl naturally, and gently close your eyes.
- Allow your jaw, tongue, and the space between your brows to completely soften.
- Remain here in total stillness for at least 5 minutes, letting go of all controlled breathing and allowing your body to absorb the practice.
The Experience:
This is the most critical and rewarding moment of the flow. After moving under an extra layer of gravity for 30 to 45 minutes, shedding the vest right before Savasana induces a profound, almost weightless floating sensation. The muscles that actively resisted the load are suddenly flooded with oxygenated blood and enter a state of complete, deep-tissue recovery. This stark contrast between high resistance and absolute surrender triggers your parasympathetic nervous system, leaving you deeply restored, grounded, and physically refreshed.
Finding the Right Vest for Your Mat
Before you invest in a weighted vest, it is critical to look beyond the price tag and evaluate the engineering. Because yoga requires deep lung expansion, multi-directional bending, and inversions, buying the wrong gear will completely derail your practice.
When shopping for the perfect yoga companion, keep these three buying pillars in mind:
|
PRODUCT |
|||
|
IMAGE |
 |
 |
 |
|
MODEL |
Z-Fit™ X-Shape |
Z-Fit™ Flex |
Z-Fit™ Belt |
|
SERIES |
Z-Fit™ |
Z-Fit™ |
Z-Fit™ |
|
RECOMMENDED SPORTS |
Running · Yoga · CrossFit · Daily |
Walking · Rucking · Yoga · Daily |
Yoga · Pilates · Ballet · Walking |
|
WORKOUT INTENSITY |
💪💪 |
💪💪💪 |
💪💪 |
|
COMFORT |
★★★★★ |
★★★★★ |
★★★★★ |
|
SHAPE |
X-Shape |
Flex / Body-fit |
- |
|
WEIGHT TYPE |
Fixed |
Adjustable |
Adjustable |
|
WEIGHT RANGE |
5 / 10 / 15 lb |
10 / 15 lb |
6 / 8 / 10 lb |
|
FILL MATERIAL |
Z-Fit™ Silicone-Iron |
Z-Fit™ Silicone-Iron |
Z-Fit™ Silicone-Iron |
|
BUILD MATERIAL |
Soft Silicone Skin |
Soft Silicone Skin |
Soft Silicone Skin |
|
NOISE LEVEL |
Zero |
Zero |
Zero |
|
COLORS |
8 colors |
1 (Black) |
1 (Black) |
|
REFLECTIVE STRIPS |
Yes |
Yes |
Yes |
|
Cleaning Choice |
Hand wash |
Machine wash |
Machine wash |
|
POCKETS / STORAGE |
No |
Yes |
Yes |
- Prioritize Material over Mass: Look for solid-state, body-conforming composites like Silicone-Iron (Z-Fit™) rather than traditional iron sand or steel plates. Iron sand shifts with gravity and leaks over time, while steel plates bruise the ribs during movement. A flexible silicone matrix moves with your skin, maintaining absolute balance. (Z-Fit™ Series Explained)
- Insist on an Open-Chest, X-Shape Layout: If you are a female practitioner, completely avoid boxy, military-style tactical carriers. Look for ergonomically contoured, X-shaped straps that distribute the load across your core and upper back while leaving your chest completely free to breathe.
- Verify the Washability: Yoga is a sweat-inducing practice. Ensure the vest features a hydrophobic, non-porous outer skin that can be easily wiped down, or an easily removable weight module system that allows you to throw the fabric shell straight into a standard washing machine.
The Verdict
When selecting gear to complement this flow, comfort dictates your results. Data from the Zelus February 2026 User survey reveals that 52% of consumers state that "real user reviews and feedback" highlighting product comfort is the most critical information they look for right before making a purchase.
If a vest chafes your skin, shifts during a Downward Dog, or chokes your breathing during Chair Pose, it defeats the mindful foundation of yoga. Choose an advanced, body-conforming layout that moves with your lung expansion, ensuring that your extra resistance stays securely on your torso so you can unlock your highest athletic potential.
Ready to Upgrade Your Routine?
If you want to take your weighted training to the next level, let me know! I can easily map out a 7-Day Weighted Vest Yoga Program, design a HIIT-Yoga Hybrid for Fat Loss, or build a custom Calisthenics + Yoga Fusion Plan tailored to your specific goals.
Before You Go…
Here are a few handpicked articles to inspire your next self-care moment.


![How to Make an Ice Weighted Vest? [Turn to Sub-Zero]](http://zelusfitness.com/cdn/shop/articles/Frame_18.png?v=1784190178&width=2000)